
Cat toy mice. We used to buy ours at the Dollar Tree, a pack of 3 for a $1.00. The same fuzzy mice they sell for much more at Wal*Mart or other stores like it.
I say "used to", because we no longer buy toy mice. Period. After watching one of our cats appear to choke on and then finally throw-up a red, gooey tail from one of those mice, I decided once and for all, that would NEVER happen again.
It is a fairly easy project. You need only minimal sewing skills and the materials.

I designed my own stencil and then cut it out of one of those thick plastic 3-ring binder dividers. You'll want to make it a little bigger than your desired finished mouse size, for sewing purposes.

If you're going to use just one color or pattern of felt, you can cut it like above so that it is all one piece. Otherwise, you cut one side out of each color/patterned felt. One piece of felt can make several mice.
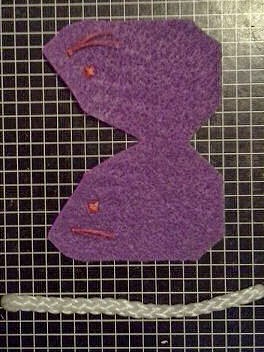
I pre-sew "X's" for eyes and install whiskers. At this point, you'll want to cut off a length of something for a tail. You can use shoestring, cording, ribbon, a strip of leather, etc. I would advise against using a strip of felt, because in a strip - it's fairly flimsy and can rip apart easily.

When you are ready to begin sewing, remember that you will sew the majority of the body inside-out. Place the tail inside the two sides, as pictured above.

This is what you should end up with. Note that where the tail is sticking out of the body should be left unsewn. Also, when sewing around the tail, make sure to put a couple stiches into whatever material you used a couple of times before continuing on. I always start from the mouse's behind and sew towards the nose.

Now, you are ready to begin the stuffing process. Turn your mouse right-side out. To stuff my mice, I use cotton balls from the Dollar Tree ($1.00 for a rather large bag, can't beat it, and it's cotton fiber rather than blended fibers). I use traditional catnip (also obtained from the Dollar Tree, and it's "organic" LOL) which I put a good sized pinch into the mouse before I stuff it. I spray the cotton balls with Catnip Mist (Wal*Mart, and a little goes a loooong way).

You're ready to finish up. I use what I call a "zipper" stitch to close. Start the stitch from inside on one side of the body and then over into the inside of the other side of the body, and so on.

Your finished mouse toy should look something like this, like a closed zipper, underneath. (See top of page for completed mouse photo)
* * *
I make about 3 of these once every other month, it only takes about an hour. They lose most of them, but every once in a while we go on a search and rescue, and I clean them up - trimming off the felt pills. We do this until they are what I consider "dead", which is ripped stitching, or the felt has just become "thread bare".
We've had no problems with these safer mice. No scary choking, no yucky gooey pieces vomited up.
I hope you consider undertaking this project if you have kitties of your own. While the faux fur on the store bought mice makes them look super cute while laying around on your floor, trust me when I say, your cat's don't care if they aren't fuzzy. I've even used this method using a cow-patterned heavy-duty material. Our kitties give these mice a two-paws up review!
No comments:
Post a Comment