Friday, November 7, 2014

Project 6: Too Many Trick or Treat Buckets?

Trick-or-Treat Buckets Galore!


My nephew had amassed a few of the pumpkin Trick-or-Treat buckets. Mostly, because on a successful Halloween night, one bucket just wasn't enough to carry his candy loot. My nephew is autistic and is insistent on using these buckets as opposed to the always handy pillow case. So my sister came to me and requested they be melded, somehow, to make one large bucket.

NOT a problem!


  • Use a utility knife to cut the bottom out of one bucket (that will be the top one). To avoid any owies when reaching down into the bucket, I used a metal nail file (they really come in handy when crafting) to smooth the edges of the bucket where I cut out the bottom. 
  • Remove the little handle from the bottom bucket.
  • Line up the bucket seams - and hot glue the "snot out of them". Pretty sure that's not a technical term lol.
  • Be sure to go all the way around and squirt plenty down into the second bucket where the two meet.
  • Once that is dried, I applied a second beading of hot glue around the outside so that it completely covered where the two met.
  • Again, once dried, I used a mini glue gun to put another beading around the INSIDE between the lip of the top bucket and the bottom bucket.

Voila! It was plenty sturdy enough to carry his candy loot.

Project 5: Scratched CDs/DVDs

Don't Toss Those Scratched CDs/DVDs!


CDs and DVDs become scratched and useless. It's a fact of life. But that doesn't mean you have to throw it away.
If you like alternative forms of art, this one's for you. It's fairly easy, but depending on the pattern you choose, it can be a little time consuming.


I use PLAID brand Apple Barrel 20404 Black Acrylic Paint (found in the crafts section of Wal*Mart, or at HobbyLobby or Michael's). Paint the data side of the CD/DVD, edge to edge. (BluRay, I'm not sure how it would come out unless you'd use a lighter color)


Once dried, use a pencil to draw your pattern onto the CD. Now, here's where the time-consuming bit comes in. I used the tip of a metal nail file to scrape off the paint. You may find a utensil that works better for you. I will say, I made a "test" CD before this one and used a razor blade - did NOT work out so well.

Once you're satisfied with your piece, you'll need to seal it to avoid accidental scratching of the surface. I used ModPodge Clear Acrylic Sealer. You can buy that in Gloss and Matte. I happened to have Gloss on hand, but, in all honesty, I think I'd like the way a Matte finish would look better.


Tuesday, November 4, 2014

Project 4: Safe Toy Mouse


Cat toy mice. We used to buy ours at the Dollar Tree, a pack of 3 for a $1.00. The same fuzzy mice they sell for much more at Wal*Mart or other stores like it.

I say "used to", because we no longer buy toy mice. Period. After watching one of our cats appear to choke on and then finally throw-up a red, gooey tail from one of those mice, I decided once and for all, that would NEVER happen again.

It is a fairly easy project. You need only minimal sewing skills and the materials.


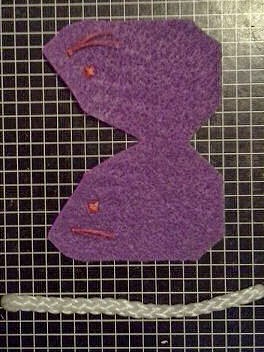
I designed my own stencil and then cut it out of one of those thick plastic 3-ring binder dividers. You'll want to make it a little bigger than your desired finished mouse size, for sewing purposes.


If you're going to use just one color or pattern of felt, you can cut it like above so that it is all one piece. Otherwise, you cut one side out of each color/patterned felt. One piece of felt can make several mice.


I pre-sew "X's" for eyes and install whiskers. At this point, you'll want to cut off a length of something for a tail. You can use shoestring, cording, ribbon, a strip of leather, etc. I would advise against using a strip of felt, because in a strip - it's fairly flimsy and can rip apart easily.


When you are ready to begin sewing, remember that you will sew the majority of the body inside-out. Place the tail inside the two sides, as pictured above.


This is what you should end up with. Note that where the tail is sticking out of the body should be left unsewn. Also, when sewing around the tail, make sure to put a couple stiches into whatever material you used a couple of times before continuing on. I always start from the mouse's behind and sew towards the nose.


Now, you are ready to begin the stuffing process. Turn your mouse right-side out. To stuff my mice, I use cotton balls from the Dollar Tree ($1.00 for a rather large bag, can't beat it, and it's cotton fiber rather than blended fibers). I use traditional catnip (also obtained from the Dollar Tree, and it's "organic" LOL) which I put a good sized pinch into the mouse before I stuff it. I spray the cotton balls with Catnip Mist (Wal*Mart, and a little goes a loooong way).
 
 
You're ready to finish up. I use what I call a "zipper" stitch to close. Start the stitch from inside on one side of the body and then over into the inside of the other side of the body, and so on.
 
 
Your finished mouse toy should look something like this, like a closed zipper, underneath. (See top of page for completed mouse photo)
 
*     *     *
 
I make about 3 of these once every other month, it only takes about an hour. They lose most of them, but every once in a while we go on a search and rescue, and I clean them up - trimming off the felt pills. We do this until they are what I consider "dead", which is ripped stitching, or the felt has just become "thread bare".
We've had no problems with these safer mice. No scary choking, no yucky gooey pieces vomited up.
 
I hope you consider undertaking this project if you have kitties of your own. While the faux fur on the store bought mice makes them look super cute while laying around on your floor, trust me when I say, your cat's don't care if they aren't fuzzy. I've even used this method using a cow-patterned heavy-duty material. Our kitties give these mice a two-paws up review!


Crap Room to Craft Room (Part 1)

My sister and I have been trying (for what seems like an eternity) to turn our "crap room" into a proper, functioning Craft Room. Doing so on an almost non-existant budget can be a bit overwhelming... UNLESS you can think outside of your own ideas. LOL

Thrift stores and roadside freebies are THE best! Period. Remember those military-style metal desks? Your teacher had one, the bank was full of them, they had them at the library, etc. They are sturdy. They are big. They are bulky and weigh a ton. My sister and I just happened to luck into picking one up at the local thrift store for $25! That my friends, is a STEAL. Then a couple days later as she was out and about in town, she found one curbside for FREE!! Both are in immaculate condition.


This had once been a pull-out file system. The wire rack that the hanging folders were hung from, no longer exists. However, it was a perfect fit for mounting my sewing machine, almost custom specifically for it! You open the door located on the left, grab the platform and full forward.


Then you simply lift up and perch it on a lip located on the door, and the door becomes the leg for the platform. How awesome is that?? Now, when not in use, the sewing machine can be put away, but it's always ready and waiting.


The middle drawer is shallow, but wide and long with plenty of room for lengthy knitting needles, paint brushes, rulers and straight edges. There are three drawers on the left with varying depths but all are equal in length. I keep tools like hot glue guns, wood burners, engravers, my bedazzler and such in the middle one. The bottom one houses miscellaneous bins containing markers, gel pens, colored pencils and the like. The top one is the shallowest of the three and is designed with a built in "inbox" type slot system.


Both desks had hutches with adjustable shelving areas. (I think this was probably an aftermarket upgradeable option, oooorrrr, went to other pieces of furniture). The shelves were not with the hutches, but in my case, I was fine with that. I had come up with this idea for my hutch after seeing a ton of organizational pins on Pinterest. What else do you do with miscellaneous spools of ribbon and Duck Tape brand tapes?


Add another shelf above the hutch for extra storage and I've got an ideal workspace that is perfect for me.

There is still much to do to complete this room. I need shelving to house many, many, many beads LOL and my sister is still working on her own space to make her desk work for her.

All in all, our "crap room" feels more like a "Crafting Room", finally.


Project 3: In a Pinch Push Pins


So, the other day, I ran out of pushpins. The reason for this inconvenience was mostly because the plastic pushpins I had, were broken (as you can see in the above photo, this yellow pushpin was the best of the bunch) or just plain MIA.


We don't exactly have the money to just go pick up a pack. Fortunately for us, in amongst all the freebie stuffs I've procured, I had a container of Upholstery tacks (or what they call "nails").


I cannot express just how useful a block of styrofoam can be. (This particular piece, I rescued from other bits of useless packing foam bits and also use it for crochet blocking). I painted the caps of the tacks a pretty and bright red, using ordinary crafting acrylic paint (Plaid Folk Art 414 "Cardinal Red") and let dry, before painting white dots (using the same type of paint).


Then, I finished them off, using what else? Mod Podge Clear Acrylic Sealer.

I use push pins for a variety of uses, and now I have some very sturdy "toad stools".
My sister has requested her own set of "lady bug" push pins. The cap designs are limited only by your imagination.

I hope you find this idea useful and fun, enjoy!

Crochet: Sister Blanket


This, is a work in progress. So, sometime before the next century passes, I'll be adding more to this particular blog entry.

This is a block I've designed for a blanket I'm crocheting for my sister. It's dimensions are 20"x15". There will be four of these across and six of them long.

**Update Nov. 7, 2014**
I've finished the gray block (photo below). This will give a better idea of what I'm going for here.


The two blocks will be staggered: one purple block, one gray block, one purple block, one gray block, etc.

I am excited about this project and hope it turns out as well as I have it pictured in my mind. Once it is complete, I will update this blog to include pictures and the pattern.


Crochet: Pink Doily


Skill: Easy
Size: About 6 inches across
Materials: Size 10 Cotton Crochet Thread: Orchid Pink
Crochet Hook: Steel No. 7 (1.65 mm)


Rnd 1: Ch 6; join with sl st to first ch to form ring; ch 3 (counts as first dc now and throughout), 23 dc in ring; join with sl st to first dc. (24 dc)

Rnd 2: Ch 4 (counts as first dc and ch 1), [dc in next dc, ch 1] around; join as before. (24 dc and 24 ch-1 sps)

Rnd 3: Sl st in ch-1 sp, ch 1, sc in same sp, ch 3, [sc in next ch-1 sp, ch 3] around; join with sl st to first sc. (24 sc and 24 ch-3 sps)

Rnd 4: Sl st in next 3 ch (center of ch-sp), ch 1, sc in same sp, ch 4, [sc in next ch-sp, ch 4] around; join with sl st to first sc. (24 sc and 24 ch-4 sps)

Rnd 5: Sl st in next 4 ch, ch 1, sc in same sp, ch 6, [sc in next ch-sp, ch 6] around; join with sl st to first sc. (24 sc and 24 ch-6 sps)

Rnds 6 & 7: Sl st in next 6 ch, ch 1, sc in same sp, ch 6, [sc in next ch-sp, ch 6] around; join with sl st to first sc. (24 sc and 24 ch-6 sps)

Rnd 8: Sl st in next 6 ch, ch 1, sc in same sp, ch 1, 7 dc in next ch-6 sp, ch 1, [sc in next ch-sp, ch 1, 7 dc in next ch-6 sp, ch 1] around; join with sl st to first sc. (12 sc, 84 dc and 24 ch-1 sps) Finish off and weave in ends.


While you are working this, it will seem to awfully ruffly. By the time I got to round 8, all I could think was, "I hope blocking fixes this otherwise this pattern becomes useless as a doily!"


I find that using styrofoam to block is the easiest. I can reuse it numerous times with no issues and it doesn't take forever and a day to dry.


I typically like to use laundry starch, but when my sister went to pick some up for me (some time ago), they had NONE! However, she was directed to the craft section of the store where she found this. (Gotta love Mod Podge - they've got something for everything!) I did dilute it down considerably and it worked like a charm!

Please keep in mind, this doily on completion is ONLY 6 inches wide, from point to point. That will vary according to individuals, and according to type of yarn used and hook size used.
I have decided that what I'd like to do for this doily, is to make a matching companion, using a size 9 hook, then to matte and frame them. I have decided after lengthy thought, that I do like how that presentation looks.
If you use this pattern, I hope you enjoy and feel free, please, to come back and share a photo of yours!

*   *   *

Note: this is not a pattern of mine. I cannot remember where I picked it up. Could've been a tear-off freebie at Wal*Mart or HobbyLobby or Michaels, it could've been in a pattern book that I bought or borrowed that ended up printed out in my crochet craft binder. It may have even come off the internet, I'm just not sure. My apologies for not being able to give proper credits.
Having said that, in this day and age, crochet seems to be becoming a dwindling art form. You can go to Wal*Mart or any other retailer and buy sweaters, blankets, even doilies, and all the other wonderful crochet items. Kids today (I say this in general, I realize it does not apply to all, but a majority) do not have an interest in such things, if there isn't a cord attached, a battery inserted or wifi enabled.
As such, I don't really believe patterns should have a cost to them. Let's face it, we can barely pay an electric bill, let alone pay for a book of instructions. Yes, it costs money to publish them via print media or fancy websites. However, It cost me minimal to share this one - electricity to turn on the computer (we pay for that anyway) and internet (which again, we pay for anyway).
At any point, when I blog a crochet pattern here, I will, to my best abilities, include my source for the pattern.